
Using GitHub and Eclipse
Get a GITHUB account and create your own fork of the EN234_FEA repository
Before doing the next steps you might find it helpful to watch Dr. Fraser's E-Git videos.
If you don't have time to watch them all, this video tutorial explains how to use Eclipse to download a project from a GitHub repository.
- Navigate to https://github.com Follow the instructions to create a new account. You can just create a free account (unless you want to create private repositories for your own research) - you will be signed in automatically once the account is complete. To sign out you can use the menu on the far top right of the screen. Don't sign out just now.
- In another browser window navigate to https://github.com/albower/EN234_FEA.git Press the 'Fork' button on the right of your screen near the top. Wait while the files are copied to your account. You now have your own copy of EN234_FEA, and will use this to track all the changes you make to the code.
Create a local repository of EN234_FEA on your computer
- Open Eclipse
- Navigate to File> Import...
- In the Select window expand Git; select Projects from Git and click Next
- Select Clone URI and press next
- Navigate to your GitHub account with your browser and find your EN234_FEA fork - there is a box with an https clone URL in it near the bottom right of the page. This is the information that Eclipse needs to connect to your online repository. Copy the URI to the clipboard, then paste this into the URI textbox in the Eclipse Source Git Repository menu.
- You will need to enter the username and password for your GitHub account (you can store it so you don't need to enter it every time you push or pull from the remote repository). Then select Next
- Select Next in the subsequent menu (there should be only one branch in the repository)
- You can accept the defaults in the Local Destination menu; it is OK to change them if you wish.
- Eclipse will ask you whether you want to enter information for password recovery. Not a bad idea....
- Accept the default 'Import Existing Eclipse Project' on the next menu and press Next.
- Accept the defaults on the Import Projects menu and press Finish
- To see the project go to Window > Perspective > Open Perspective > Other then select Fortran from the menu and press OK (you may need to click the little tab just below the File menu if you have the Eclipse Welcome screen displayed still).
- You can add the GIT menus to the top of the Fortran perspective by selecting Window > Customize Perspective; select the Action Set availability and check the Git box
- It is also helpful to add the Git Repositories and Git Staging navigation window to the Fortran perspective by selecting Window > Show View > Other; expand the Git folder in the Show View menu and select Git Repositories and Git Staging. They will appear in the group of tabs on the bottom middle of your Eclipse perspective but you can drag the tabs and move them wherever you like (in the video Dr Fraser has the Git Repositories window on the left).
Build and run your copy of EN234_FEA (Windows)
- Select Project > Build All in the Git window - you can pull up the Console tab in the bottom window of Eclipse to watch warning messages (the warnings are not important - a large number of variables are supplied to user subroutines that won't be used until some code is added to the user files).
- Select the executable file in the bin directory of the Project Explorer window and select Run.
- Right click the output files directory in the Project Explorer window and select Refresh
- You should see some files - if you open the linear_elastic_3d.out file (just double click in the Project Explorer window) you will see some information about the computation. You can open the contourplots.dat file as well - this is really a data file for Tecplot
Build and run your copy of EN234_FEA (Mac)
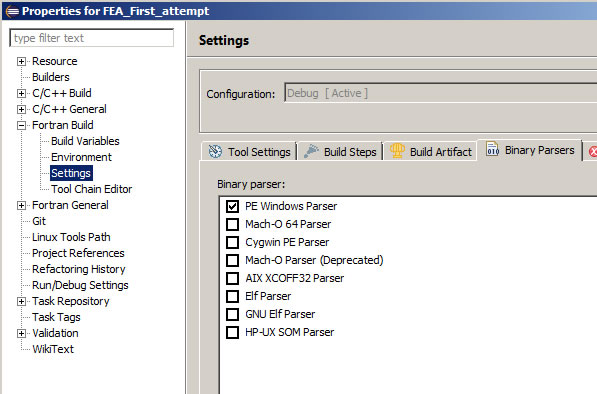
- Select Project > Properties, then find the Fortran Build/Settings options, and click the tab for Binary Parsers. Instead of Windows PE, select Mach-O 64 Parser (see the figure below) instead of the Windows parser
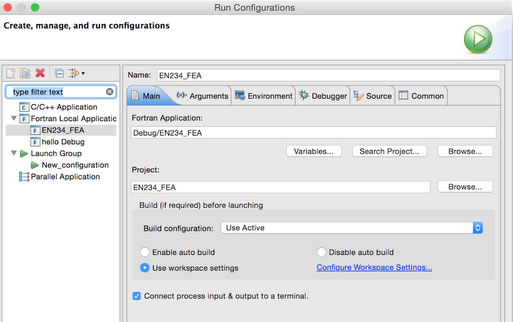
- Open Run > Run Configurations and make sure that the path says Debug/EN234FEA in the Fortran Application window(see below)
- In the Eclipse Project Explorer window expand the Modules directory and double click the file called ParamIO.f90. Edit the line that says IOPSYS=1 to IOPSYS=0
- Open the input file you want to run (eg holeplate3d.in) in the input files directory and change any file paths in the input file that have a \ in them (windows) to be / instead (linux or Mac)
- Select Project > Build Project - you can pull up the Console tab in the bottom window of Eclipse to watch warning messages (the warnings are not important - a large number of variables are supplied to user subroutines that won't be used until some code is added to the user files).
- Select the executable file in the bin directory of the Project Explorer window and select Run. Some people have been reporting a Floating Exception error in the console window after the code has completed. I do not know what is causing this (it may be an uninitialized variable somewhere) but the code seems to be producing correct output for cases that have been tested so far (since the error doesnt show up on Win it is hard to debug....)
- Right click the output files directory in the Project Explorer window and select Refresh
- You should see some files - if you open the holeplate3d.out file (just double click in the Project Explorer window) you will see some information about the computation. You can open the contourplots.dat file as well - this is really a data file for Tecplot
Add the original EN234_FEA repository as a second remote (you can do this later if you like - you will need it to merge updates and bug fixes made to the original repository with your own codes)
- In the Git Repositories menu right-click Remotes and select Create Remote
- Enter a name (eg EN234_FEA_source) and select the 'Configure Fetch' option
- Press Change next to the URI texbox. For the URI enter http://github.com/albower/EN234_FEA.git (if you copy the link to your clipboard it will be entered automatically). Press Finish.
Merging bug fixes and updates to the original EN234_FEA repository with your fork
- In the Git Repositories window expand the Remotes folder, expand EN234_FEA_source and right-click the icon with the downward pointing green arrow (which stands for fetch), and select Fetch. This will download the bug fix from GitHub
- In the Git Repositories window find the Remote Tracking folder, expand it, and right click EN234_FEA_source/Head, then select Merge. If you are lucky the merge will be a fast-forward and any changes made to the remote repository will simply appear in your copy of the code.
- If the result of (2) was not a fast-forward merge, it means that the changes you have pulled from the original repository conflict with changes you have made to your copy of the code. This video shows you how you can merge the changes manually
- Once the merge is complete, you can push the changes to your fork on GitHub by selecting your local branch (Under Branches/Local in the Git Repositories and then Git > Push to Upstream (or use the button) will put the changes online.