|
|
 |
 |
 |
 |
 |
 |
 |
 |
 |
 |
 |
 |
 |
Conditions FilesIntroduction to Conditions Files
Introduction to Conditions FilesConditions Files are text files which specifiy explicitly each possible combination of stimuli ("TaskObjects") within a trial. Each of these stimulus combinations comprising a unique trial type is referred to as a "condition." During experiment execution, conditions are selected to run as determined by the options set in the main menu. For example, conditions can be selected randomly (with or without replacement), in incremental or decremental order, or according to any user-defined algorithm; they can be grouped into blocks, and these can likewise be selected randomly or according to any user-defined algorithm, after a specified number of trials, or after a certain user-specified criterion has been achieved (e.g., evidence of learning); writing a custom program to determine when a block changes can work in conjunction with code that determines which block is selected next (and the same code can serve both purposes). Each condition specifies an associated Timing File. This timing file will then specify when and under what circumstances a stimulus is presented, calling up each one by its columnar location (i.e., TaskObject number). A conditions text file consists of a header followed by consecutively numbered conditions. All columns are tab-delimited (multiple tabs without text will be reduced to one, and no intervening blank columns are permitted):
This is an example of a conditions file for a DMS (delayed match-to-sample) task using a total of 4 picture stimuli, 2 of which appear in each block (a more specific description of this task can be found in the example experiment). Those blocks are specified in the "Block" column: the numbers here correspond to those blocks in which each condition can appear. Here, for instance, block 1 uses only images A and B, block 2 uses C and D, and all images are used in block 3. Therefore, if the user chooses to run only block 2 from the main menu (or if that block is selected on-line during task execution according to pre-specified criteria), only conditions 5-8 will constitute the pool of possible conditions to run; running block 3, on the other hand, will allow all conditions to be placed into the selection pool. The Frequency column gives the weight or likelihood of that particular condition being selected randomly relative to other conditions. For example, if a condition has a relative frequency of 3, it is as if that condition is listed 3 times; that is, it has 3 times the chance of being selected as a trial with a relative_frequency of 1, if conditions are being selected at random within each block. The Timing File refers to the Matlab m-script which calls up each stimulus at the appropriate instant and checks for fixation, target acquisition, etc. Each condition can be associated with a different timing file, if desired. The Info column is here being used to pass labels to the timing file about which image is being used for the sample, and where the matching image is being displayed; this column is intended to make deciphering the conditions easier for the user, and does not affect actual task execution. Each TaskObject consists of a three-letter symbol (fix, dot, pic, mov, crc, sqr, snd, stm, ttl, or gen - see TaskObject table below), and parameters for its generation or display. In principle, any experiment can be designed such as to work with one condition containing all possible stimuli and a timing file that chooses among these stimuli as needed, on-the-fly. This is workable, but not ideal for several reasons. First, in order to know what actually happened in a given trial, an event marker would need to be sent representing each stimulus or event as it actually occurs within a trial, because this information would no longer be apparent from the condition number alone; furthermore, searching through the data stream to retrieve these codes is a cumbersome task, and is more error-prone than simply checking the condition number stored in the behavioral data file. Therefore, although it is not unusual for a seemingly simple task to require hundreds of conditions, this is nevertheless usually preferable to having hundreds of variations represented by a slew of event markers scattered throughout the data file (i.e., by assigning each of the possible sequences of events to a single condition number, one can simply look at that number and know immediately what transpired on that particular trial). Second, relying solely on the timing file to select the sequence of events bypasses the options available in the main menu to alter the way conditions and blocks are selected (e.g., random, random-without replacement, etc.); such functionality will therefore need to be replicated from within the timing file. Third, using separate conditions allows one to easily change the relative frequency of particular conditions to compensate for biases or learning deficits exhibited by the subject (see the Relative Frequency column, above). Lastly, because the creation of a conditions table requires the explicit enumeration of all possible stimulus sequences, its creation is often a good opportunity to catch and re-work unbalanced features of the task.
TaskObjectsWithin each TaskObject field of the conditions file, a particular type of object is specified by a 3-letter name followed by arguments within parentheses. The specific arguments for each type of object are listed in this table:
For visual stimuli, a TaskObject with a lower number (towards the left of the list) will layer atop those to its right. Therefore, most users will want fixation point images, for example, to be the first item listed, so that it will remain visible over any images that might appear at the same location.
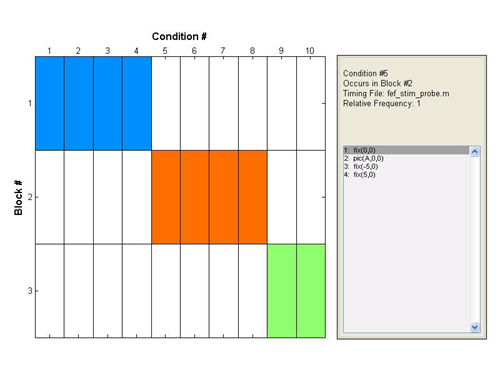
Charting Blocks and ConditionsFor any given conditions file, to see the relationship between particular conditions and the blocks in which they can appear one can use the "chart blocks" function found within the task submenu of the main menu. This will produce a graph similar in nature to one of these:
The figure above shows the organization of a conditions file which describes an experiment in which no condition may appear in more than one block (no column contains more than one condition), and each block consists of a set of conditions which uses a unique timing file (the different colors in each row). Clicking on a particular box will call up specific information about that condition / block combination to the right.
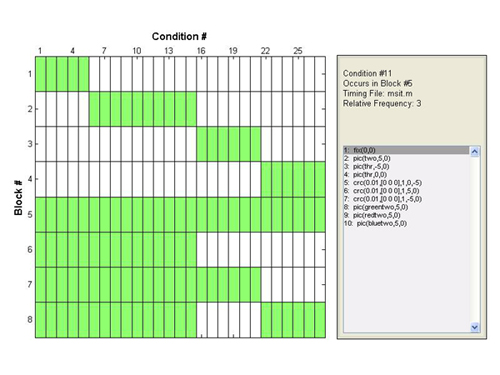
This figure shows the organization of a conditions file in which any condition can appear in more than one block (for instance, block 5 is the set of all conditions while blocks 1 through 4 contain non-overlapping sets of conditions). These graphs provide a useful way to get a quick overview of how a conditions file is structured.
The generate_condition FunctionGenerating conditions files using a Matlab script or function can be very helpful whenever a task involves many conditions. To assist this process, the "generate_condition" function is available:
Example: Setting the TaskObject and Info structures as follows: TaskObject(1).Type = 'Fix'; TaskObject(2).Type = 'Mov'; TaskObject(3).Type = 'Crc'; Info.Stim1 = 'Grating'; Then feeding these into the generate_condition function as: textline = generate_condition('Condition', 3, 'Block', [1 2 3], 'Frequency', 1, 'TimingFile', 'MyTF', 'Info', Info, 'TaskObject', TaskObject) textline = 3 'Stim1', 'Grating', 'Stim2', 'Green Circle' 1 1 2 3 MyTF Fix(0, 0) Mov(Grating.AVI, 3, 0) Crc(2, [0 1 0], 1, 0, 0) Likewise, to generate a header for this file: textline = generate_condition('Header', 3) textline = Condition Info Frequency Block Timing File TaskObject#1 TaskObject#2 TaskObject#3
|
| This site last updated: May, 2014 | © 2008-2014 |