"Once out of its container, treat it with the gentleness of a new-born babe. Protect it from evil influences. Beer is easily corruptible -- taking up with wayward odors as eagerly as a fresh-churned butter ball. Light is its bugaboo. So, keep the bottles in a dark place, right side up." -- Eloise Davison, Beer in the American Home
"Your siphon is ready--don't be intimidated by it, it's only beer. Relax." -- Charlie Papazian, The Complete Joy of Home Brewing
Note: Most of the information on this page, other than that which came from my own experience (you'll know it when you see it) or that which I considered common knowledge (like what a pot or a bottle is), came from Papazian's book. Full citation of it can be found on the table of contents page.

Brewpot
This is a pot. I boil things in it. The pot has been around for pretty much all of history, used for any type of cooking that involves liquid. The brewing of beer is only one of these many uses. Since this pot is used for brewing, the term "brewpot" becomes applicable to it. As an item of cookware, its function is to transmit heat from a fire to food without actually exposing the food to the fire, which might cause its combustion. Yes, I just defined the term "pot" for a school project. My parents must be so proud of me.

Fermentation Vessel
Any hollow object that is airtight except at one spot can be a fermentation vessel. In the old days, they used barrels sealed with pine resin; I'm using glass. The switch from one to the other probably occurred around the time when glass became easier to come by than wooden barrels--around when the 20th Century rolled around. Basically, it's where I put the beer while it's fermenting; while this happens, I need to keep foreign air and all its associated contaminants out, but at the same time I need to let out all the excess carbon dioxide that fermentation on as large as a scale as I've got planned will necessarily create, or the internal pressure will rise too high and threaten to crack or otherwise damage my vessel. In order to pull this off I'll need some type of clever gadget...

Fermentation Lock
...like the Fermentation Lock! It contains two chambers which may be filled with liquid--water is typically used, but I used vodka due to its intrinsic ability to kill microbes. The chambers are arranged in such a way that gas may flow through them, but only by passing through the liquid. In an environment where the atmospheric pressure is much higher on one side, gas can bubble from that side to the other, but none can penetrate the other way unless the comparative atmospheric pressure shifts for some reason. If I hook this up to the opening in my fermentation vessel, after enough fermentation occurs, the pressure inside will increase, but some excess gas will be pushed through the lock, thus reducing the pressure before it gets to dangerous levels. At the same time, outside air, with all its mysterious contaminants, is kept safely out of the vessel.

Malt / Malt Extract
Everything starts from the grain. The most common grain used in brewing is barley; specifically, malted barley, or malt for short. Barley is malted to release some more of its fermentable sugars, which are obviously important. The malting process basically consists of allowing barley to germinate for a little while, then stopping it before it can finish. This is done by steeping it in water for about 40 hours, draining and refilling every so often, then moving the wet barley to a 60°F germination room for about five days; at the end of this period it is referred to as green malt. At this point, the green malt is dried by raising the temperature of the room gradually to either 122°F or 221°F depending on the kind of malt desired. After any roots that may have sprouted during germination are removed, the malt is ready for use. (A jar of malt as it would appear at this phase is pictured, above on the right.) At this point, the mashing process begins: the malt is broken up by grinding it, and water is mixed in; later, the solid malt is removed and sparged, and the liquid that remains is called mash. From here, the addition of hops and more water and some boiling can turn the mash into wort, which is kind of like malt tea and is ready to be fermented into beer.
Unfortunately, I didn't really have the resources, time, or skill to do all of that, so I used malt extract instead. The extract I used, pictured above in the center and on the left, was made basically by evaporating some of the water from mash. Concentrated malt extract is easier to transport than mash, and can be reconstituted by boiling with some more water, like I did when I tried my hand at Brewing Beer. In order to get the correct amount of wort that is also the correct concentration, I used malt extract in both syrup form, which is only partially dehydrated, and powder form, which is completely dehydrated.

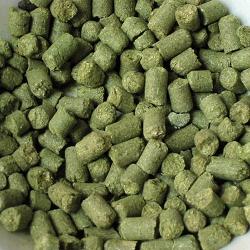
Hops
Hops are a bitter flower added to wort to cancel out the sweet taste of the malt and give the beer a more well-rounded taste, as well as giving it its distinctive aroma; they also have additional functions like inhibiting bacteria growth, which was especially concerning in the days before refrigeration, when they were all that kept beer from going bad. Hops sometimes made beer bitter, but if it spoiled it went sour, which was definitely worse. Other plants, notably spruce, ginger, and ground ivy, have been used as well, but hops has won out in the long run due to how well its flavor complements malt as well as, of course, the plant's hardiness and ease of cultivation.
Some of the hops I used were in concentrated "pellet" form, pictured in the lower of the two above images, and some were in the form of dried leaves. Pellets, which as you can see look something like gerbil food, are pulverized in a hammer-mill before being compressed into tiny cylinders for ease of transport. Hop pellets are not easily removed from beer--part of the sediment that had formed at the bottom of my fermentation vessel was made up of spent hop pellets--but since I could remove most of my beer from contact with them without removing them as well (see the auto-siphon), it wasn't really an issue. The dried leaves, pictured in the higher of the two above images, didn't stay in my wort for long and were mostly added for aroma, but if I had more of them I could probably have used them exclusively. They're usually added to the wort in a cloth sack--see a picture of this on the Brewing Beer page--for easy removal.

Yeast
Yeast is probably the most valuable fungus to human life (note: I cannot back up that statement), for the simple reason that it can be counted on to reliably conduct anaerobic glycolysis, or fermentation. One notable byproduct of this process, as conducted by yeast, is carbon dioxide, which causes bread to rise. Another is ethanol. Ethanol, like all alcohols, is pretty good at killing stuff, but in addition it has a special property: when ingested by a large animal, it functions as a potent depressant. It gets us drunk. Other alcohols, like methanol or isopropanol, carry out the much-less-enjoyable function of blinding us. More about the ins and outs of fermentation are on the Beer: The Scientific Process page.
Anyway, back to yeast. Yeast is a single-celled organism, meaning that when it is grouped together in large enough quantities that it is visible to us, it is not easily recognizable as "alive." This has a lot to do with why my example picture is a little plastic thing that says "Yeast" on it. Yeast itself looks like brown powder. It's not especially interesting to look at. There are two families of beer yeast: ale yeast, which ferments on the top of beer at 60°F, and lager yeast, which ferments on the bottom at 50°F. The type of yeast you use has an effect on the final taste of your beer, as much as the malt itself does. There are, of course, hundreds of different strains of ale and lager yeast, but each can be classified as one of those two categories.

Hydrometer
The hydrometer is a device used to measure the specific gravity of liquids, which is a measure of the liquids' density, specifically as compared to the density of water. To clarify, a liquid that is exactly as dense as water will have a specific gravity of 1, while one that is denser by one tenth will have a specific gravity of 1.1, and so on. The hydrometer determines this by measuring the buoyant force of the liquid, which is directly proportional to a liquid's density: an object that would sink in water might float in a pool of mercury, for example. This is applicable to brewing in that the specific gravities of beer before and after fermenation are different, and so a batch of beer's specific gravity is a good way to determine whether it is finished fermenting. It'll vary from beer to beer, but generally speaking, if it doesn't change for 2 or 3 days, fermentation is probably complete.

Bottles
These are some beer bottles that were lying around my kitchen. Bottles are vessels used to carry liquid. They have narrow tops, allowing for good control of where the liquid will go when the vessel is emptied, and wide bottoms, allowing for more liquid to be stored inside. This vessel design has been around since prehistoric times. These particular bottles can be capped by use of a bottle-capper, a fearsome-looking device that uses leverage to bend a thin sheet of flexible metal around the bottle's mouth. For a picture of this, see the Brewing Beer page.


Bottle-Filler
A relatively recent contraption of which I was unaware until I found it at the homebrew store. This is one of a few tchotchkes I used that are apparently entirely without history--books don't mention it, and Internet searches only turn up merchant sites selling them. The best I can do, then, is describe it. Basically, this is a hard plastic tube with a special head that will open up when its button is pressed. This makes it useful for filling bottles in that if a flow of beer is introduced via the open end and the apparatus is lowered down inside a bottle, the lower end can be pressed against the bottle's bottom and the beer released into the bottle; then, when the bottle threatens to overflow, the flow can be stopped just by lifting the bottle-filler a little bit. One of a few gadgets that make the modern homebrewer's job a little easier. Presumably, in the old days they either just poured the beer into a funnel, or perhaps siphoned it through an animal intestine or something which they could stop just by squeezing it. I'll try to find some more info on that, but I'm not sure if it exists.

Plastic Tubing
I'm not really sure how best to research the use of plastic tubes. Uh, I use my auto-siphon to propel beer through this. At the Samuel Adams brewery, and presumably other industrial breweries, they use pipes. Fascinating.


Auto-Siphon
A newfangled contraption similar to the bottle-filler in its apparent nonexistence. Using siphoning tubes can be done without it--in fact, my primary homebrewing resource, The Complete Joy of Home Brewing by Charlie Papazian, does not mention auto-siphons at all, and it was written in 1984! The method Papazian recommends for getting beer to flow through tubing is by filling the tube completely with water, letting the water fall into the destination, and letting hydrogen bonds take care of the rest; another method people apparently use is putting one end of the siphon in the beer and creating suction at the other end using their mouths, like drinking through a straw. Perhaps my auto-siphon, which allows me to simply pump the beer into the tube, acts as a distancing agent, signifying that I would like to remove myself physically from my own creation, but that sounds suspiciously like it should be someone else's project.
The entire apparatus is shown in the topmost of these three pictures; the second picture is a close-up on the top end of the siphon. That little bendy-straw-shaped dealie is what one pumps up and down, and also where the liquid exits. The third picture is a close-up on the bottom end, which is submerged in the liquid which one wishes to pump, and where the liquid is compressed through the motion of the pump in order to propel it upward.

Priming Sugar
This is, quite plainly, sugar. It's glucose (yes, I know it says "dextrose," but those are totally the same molecule), and it comes from corn. It's in basically every modern food, either as a sweetener--either in this form, or as corn syrup--or after being fed to draft animals. For why this is a bad thing, see this book. However, we are tolerating this evil for the purpose of brewing, because this corn sugar is going to be used for priming. By the time we reach the bottling phase, the beer will be running fairly low on fermentable sugars, and some of it will be dead. If we add a mixture of corn sugar and water to the beer, the rest of the yeast will pounce upon it like a starving man upon a pile of Cheetos, resulting in a fermenting frenzy that will carbonate our beer nicely--remember, another byproduct of fermentation is carbon dioxide. If too much priming sugar is used, apparently, the bottles could become over-pressurized and explode. I don't think I'd need to try very hard to convince you that this is the coolest possible way this experiment could fail, but all the same, success is probably cooler. Once the overzealous yeast has finally eaten through all of the priming sugar, it will starve to death, leaving nothing to stand between us and pure liquid refreshment.
Back to Beer: Table of Contents
Posted at Dec 16/2008 08:55PM:
Allan Stewart: Wow, this image has so much meaning in it that I can't begin to describe it. [link]
